
How to Add a Clickable US Map to WordPress (Step by Step)
By: Botrous Kerolos
Published on:
If you run a WordPress site for an organization that works across the United States, someone has probably asked you for “a map where people can click their state,” leading to a state page, a local office, or a list of partners.
This guide is for the person who has to build that map. You do not need to write code. By the end you will have planned your state links, installed a clickable US map plugin, colored the states, given each one a link and a short tooltip, placed the map with a block, an Elementor widget, or a shortcode, and checked it on desktop and mobile before publishing.
The steps use the free Interactive US Map plugin from WP Map Plugins, the tool I know best. The planning and testing advice applies to any clickable map.
On this page
- What a clickable US map can do on a WordPress site
- What you need before you start
- Install the plugin and place the map
- Color the states and set hover styles
- Add a link and a tooltip to each state
- Preview on desktop and mobile, then publish
- Worked example: a three-group partner map
- Optional next steps
- Common mistakes
- FAQ
What a clickable US map can do on a WordPress site
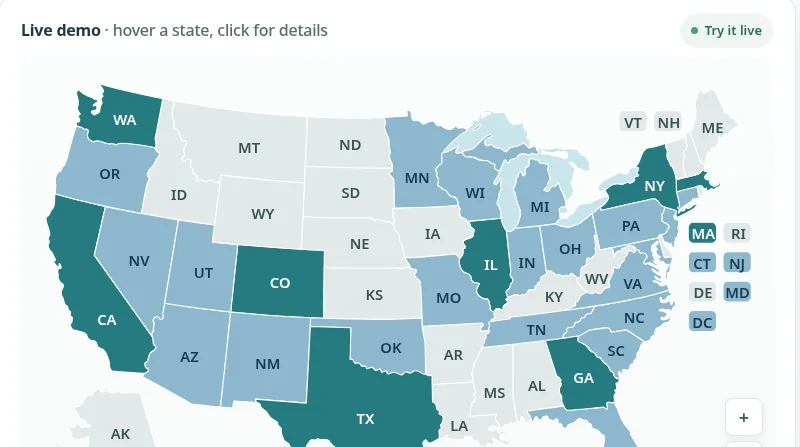
A clickable US map shows the 50 states with every state as its own interactive area. On hover, a state changes color and shows a short label. On click, it usually opens a page.
That simple behavior covers a lot of real jobs:
- Locations and offices. Each state with an office links to that office’s page.
- Dealers, partners, or distributors. States are colored by who covers them, and each one links to a contact page.
- Sales territories. Colors show which rep or team owns each state.
- State-by-state information. Licensing rules, program availability, or events, with one page per state.
- Service areas. States where you work are colored; the rest stay neutral.
It is not the right tool for everything. If visitors need street-level detail, directions, or address search, a street map such as Google Maps or OpenStreetMap is the better fit. A state map answers “which state?” and hands the visitor to the right page.
What you need before you start
Ten minutes of planning saves an hour of clicking around the editor. Before you install anything, gather the following.
1. Access to WordPress
You need an account that can install plugins (usually an Administrator). On a client site, use a staging copy if one exists. The current plugin version (3.1.4) needs WordPress 6.3 or later and PHP 7.4 or later.
2. The page where the map will live
Decide where the map goes, such as a “Locations” or “Where we work” page, and draft a short introduction for above the map. Without it, visitors have to guess what the colors mean.
3. A list of states and where each one should go
This is the most important part of the preparation. Make a simple spreadsheet with one row per state you care about, and these columns:
- State
- Group (for example Office, Partner, Not yet)
- Color (one color per group, written as a hex code such as
#227A7C) - Tooltip (a few words shown on hover)
- When clicked (a page URL, or “nothing”)
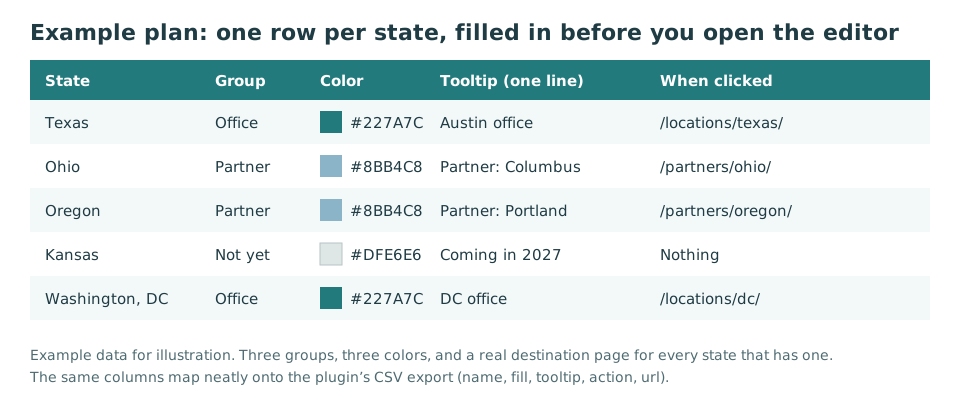
Only link a state to a page that exists and is genuinely about that state. If you have nothing to say about Kansas yet, leave Kansas unlinked. We will come back to why in the mistakes section.
Install the plugin and place the map
Step 1: Download and install
- On the Interactive US Map WordPress plugin page, choose Download the free version to get the plugin zip file.
- In WordPress, go to Plugins → Add New Plugin → Upload Plugin.
- Choose the zip file, click Install Now, then Activate.
A new US Map item appears in the WordPress admin menu. That is where you design the map. The documentation covers the same steps with more detail.
Step 2: Open the editor and look around
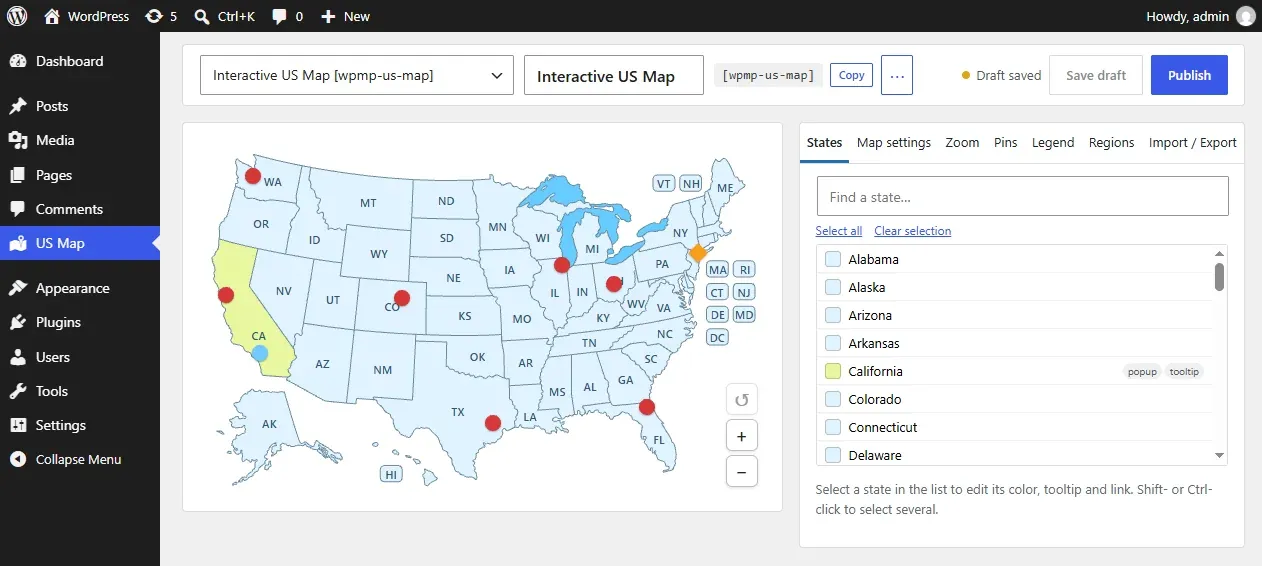
Click US Map in the admin menu. You will see a live preview of the map on the left and a panel on the right with a searchable list of states. The preview behaves exactly like the published map, so you can hover and click while you work.
Step 3: Place the map on a page
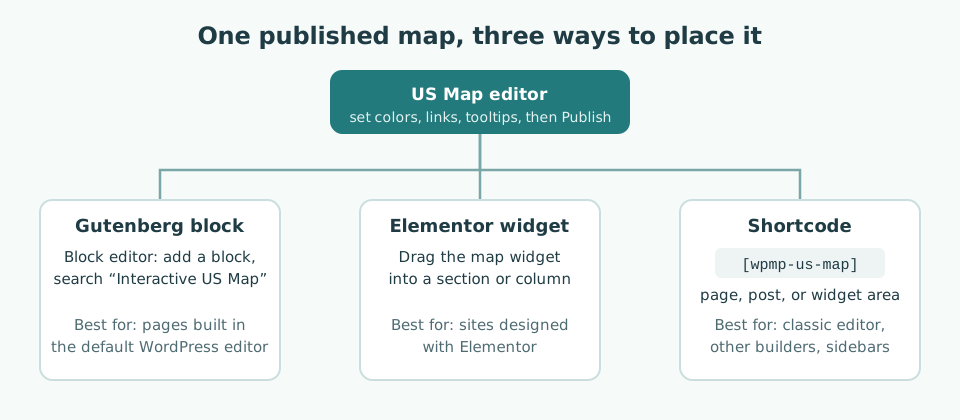
Once the map is published (we will do that at the end), you can place it in one of three ways. Pick whichever matches how your site is built.
- Gutenberg block. In the block editor, add a block and search for Interactive US Map.
- Elementor widget. In Elementor, drag the map widget into a section or column.
- Shortcode. Paste
[wpmp-us-map]into a page, a post, or a widget area. This works with the classic editor and with most other page builders.
If shortcodes are new to you, our beginner’s guide to shortcodes explains what they are and where they can go.
I recommend placing the map on a draft page early. Seeing it inside your real theme, at its real width, shows whether the colors fit the site.
Color the states and set hover styles
Good map colors do one job: they show groups at a glance. Start with the map-wide settings, then color the states in groups.
Step 4: Set the map-wide defaults
Open Map settings in the editor. This is where map-wide options live, such as the inactive color, the border color and width, and the tooltip colors. Set these first:
- A neutral base for states you do not color, such as light gray or pale blue.
- A thin border, a little darker than the base, so small states stay readable.
Step 5: Color states in groups
Now return to the list of states. For each state you can set four colors:
- Color: the normal fill.
- Hover color: the fill when the pointer is over the state.
- Label color and label hover color: the state abbreviation, normally and on hover.
You do not need to repeat yourself fifty times. Select several states at once (Shift-click or Ctrl-click in the list) and change their color together, one group at a time.
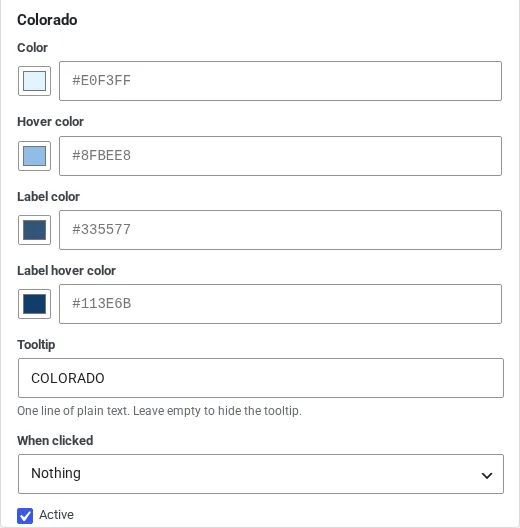
A few color habits that save trouble:
- Use three to five colors at most. More than that and visitors stop decoding.
- Make hover colors clearly different. A slightly darker shade of the fill is enough.
- Check label contrast. On a deep fill, switch that group’s label color to white.
- Do not rely on color alone. Name the groups in the text above the map, and keep tooltips meaningful. Our post on building an accessible web map goes further on contrast and keyboard use.
Add a link and a tooltip to each state
Step 6: Write the tooltip
The tooltip is the small label a visitor sees on hover. In the free plugin it is one line of plain text (up to 30 characters). By default it shows the state’s name in capitals. If you leave the field empty, the tooltip is hidden. A “Use the default tooltip” control restores the name.
Good tooltips add one piece of information the color cannot:
- “Austin office”
- “Partner: Columbus”
- “Coming in 2027”
Keep them short. A tooltip is read in a second, while the pointer is moving.
One limit is worth knowing before you plan: a tooltip cannot contain a clickable link. It closes as soon as the pointer leaves the state or the state is clicked, so nothing inside it can be clicked. Put the link on the state itself (next step). If you need room for a phone number, a photo, and a link together, that is the job of a popup window, which is a premium feature.
Step 7: Choose what happens on click
Under When clicked, choose one of two actions:
- Open a link, in the same tab or a new tab.
- Nothing, for states that are shown for information only.
For pages on your own site, the same tab is usually better, because visitors expect the back button to work. Use a new tab mainly for other websites.
Step 8: Save time with a spreadsheet (optional)
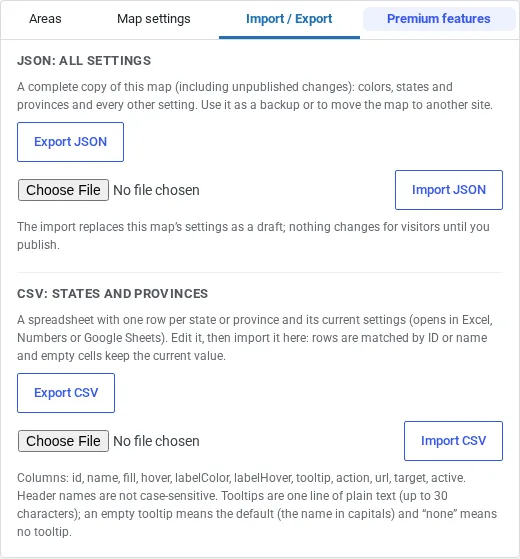
If you have many states to fill in, use Import / Export. Export CSV downloads a spreadsheet with one row per state and its current settings. Edit it in Excel or Google Sheets, then Import CSV. Empty cells keep the current values, so you can update only the columns you care about. The JSON export saves every setting of the map, which is handy as a backup or to copy the map to another site. Both are in the free plugin.
Preview on desktop and mobile, then publish
Step 9: Test in the editor preview
Before you publish, hover and click a handful of states in the preview, including the awkward ones:
- Small northeastern states. Nine smaller or crowded states (Connecticut, Delaware, Hawaii, Maryland, Massachusetts, New Hampshire, New Jersey, Rhode Island, and Vermont) use small labeled boxes beside the map, called callouts. Hovering or clicking a callout works the same as the state itself.
- Washington, DC. DC is its own clickable area, with its own color, tooltip, and link. Do not forget it if you have a DC office.
- Alaska and Hawaii. Both are part of the same map.
Step 10: Publish
Click Publish. Changes go live on every page where the map is placed. Until then, visitors see the previous version, so you can work without breaking the live page.
Step 11: Check the real page on a phone
Open the page on a real phone, not only a narrow browser window. Check that:
- the map fits the screen width without sideways scrolling;
- you can tell the color groups apart outdoors, at normal brightness;
- tapping a state does what you expect;
- the text above the map explains what the colors mean.
The map is SVG (vector graphics) inside your own page, so it stays sharp at any size and loads no third-party map service. For background, see Vector (SVG) vs. Raster (PNG) maps.
Worked example: a three-group partner map
Imagine a company with offices in Texas and Washington, DC, partner firms in about fifteen states, and plans to expand into Kansas next year.
- Plan. Three groups: Office (dark teal), Partner (light blue), Not yet (grey). Kansas gets the tooltip “Coming in 2027” and no link.
- Color in batches. Select all partner states at once and set the light blue. Then select Texas and DC, set the dark teal, and switch their labels to white.
- Tooltips and links. “Austin office,” “DC office,” and “Partner: city name,” each linking to its page in the same tab.
- Place. The
[wpmp-us-map]shortcode on the “Where we work” page, under two sentences explaining the colors. - Check. Hover the callout boxes for the small states, tap DC on a phone, and confirm Kansas does nothing when clicked.
Once the spreadsheet is ready, the map itself is quick. The planning is what makes it useful.
Optional next steps
You now have a complete working map. If the project grows, these are the usual next steps:
- A legend under the map to explain the colors (premium).
- Regions that group states so they highlight together and share one color, tooltip, and click (premium).
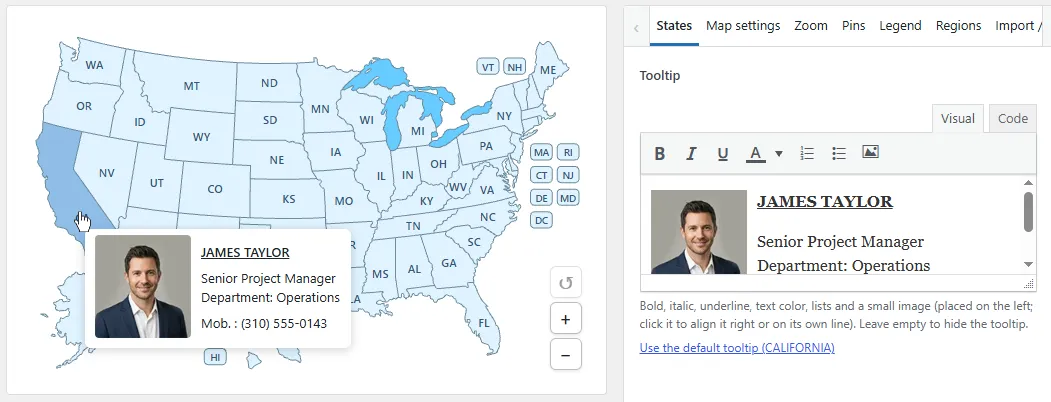
- Richer content. Premium formatted tooltips allow bold text, lists, and a small image; popups can hold images, links, and video.
- Several maps on one site, each with its own settings and shortcode, such as
[wpmp-us-map-2](premium). - County-level detail. If visitors need to pick a county, not just a state, a single state map with its counties is the right tool. See the individual US state maps. Our post on individual state maps for local SEO covers when that makes sense.
Common mistakes
Linking every state to the homepage. A click that lands on the homepage feels like a broken promise. Link a state only when it has a page worth visiting, and set the rest to Nothing.
Colors that fight the text. Dark labels on dark fills, or two groups in nearly the same shade, make the map hard to read.
Too much text in tooltips. Addresses, hours, and links belong on the state’s page (or in a premium popup).
Mixing up the 50-state map and the territories map. The Interactive US Map covers the 50 states plus DC. It does not include Puerto Rico, Guam, or the other territories. If your organization serves territories, use the Interactive US Map with Territories instead of trying to add them by hand.
Forgetting to publish. If the page still shows the old map, check that you clicked Publish, then clear any caching plugin.
FAQ
Is Washington, DC included on the map?
Yes. The District of Columbia is its own clickable area on the Interactive US Map, with the same color, tooltip, and link settings as any state.
Does the US map include Puerto Rico and other territories?
No. This map covers the 50 states plus DC, with Alaska and Hawaii included. For Puerto Rico, Guam, and the other territories, there is a separate Interactive US Map with Territories plugin.
Can a tooltip contain a link?
No. Tooltips close when the pointer leaves the state or when the state is clicked, so nothing inside them can be clicked. Link the state itself under “When clicked,” or use a premium popup if you need links, images, or video in the same window.
Which shortcode do I use, and can I show more than one US map?
The shortcode is [wpmp-us-map]. You can also use the Interactive US Map block in the block editor or the Elementor widget. Several different US maps on one site, each with its own colors and links, are a premium feature, with extra shortcodes such as [wpmp-us-map-2].
What is the difference between the free and premium versions?
The free plugin is a complete 50-state map, not a timed trial: the visual editor, colors, links, one-line tooltips, the block, the Elementor widget, the shortcode, and JSON and CSV import and export. Premium adds zoom and pan, formatted tooltips, popups, pins, regions, an optional legend, several maps on one site, custom labels and fonts, and CSS classes per state. Install premium and activate it; it replaces the free copy and keeps your settings, with no license key. The free version keeps a small credit link under the map; in premium it is off unless you turn it on.
Try it on your own site
The quickest way to learn is to build a small version of your own map. Download the free version from the Interactive US Map WordPress plugin page, color a few states, and place it on a draft page. If you later need zoom, popups, a legend, or regions, the same page lists the premium features and the current price. WP Map Plugins is our product.
Related reading
- What is a shortcode? A beginner’s guide
- Vector (SVG) vs. Raster (PNG) maps: which is best for web design?
- How local businesses can use individual US state maps for hyper-targeted SEO

About the Author
Botrous Kerolos has been designing and building interactive maps for the web since 2009 — from early Flash/SWF maps to modern SVG — and leads development at WP Map Plugins, helping WordPress sites turn static content into fast, accessible, interactive experiences.